Enhancing Connection Efficiency with 4 Way Terminal Blocks

In the fast-evolving world of robotics, efficient and reliable connections play a crucial role in ensuring optimal performance. One innovative solution that has gained significant traction is the 4 way terminal block. With its advanced features and versatile applications, this compact connector is revolutionizing the way robots are controlled and managed. In this article, we will explore the benefits and emerging trends surrounding 4 way terminal blocks, providing valuable insights into their importance and impact in the robotics industry.
Understanding 4 Way Terminal Blocks
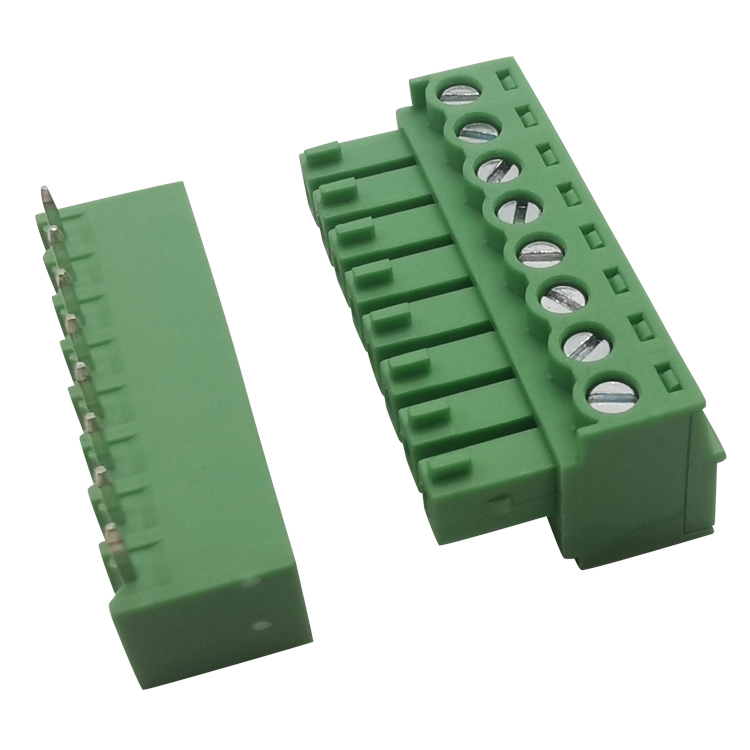
When it comes to establishing secure and efficient connections, the 4 way connector block stands out as a reliable solution. With its ability to connect up to 4 wires simultaneously, this versatile connector simplifies complex wiring setups, optimizing the overall system performance. Whether it's in industrial automation or robotic control systems, the terminal block 4 way streamlines connectivity, enhancing productivity and minimizing downtime.

Versatility and Flexibility of 4 Way Terminal Blocks
The adaptability of 6 pole terminal block is a key factor contributing to their growing popularity. These terminal blocks are available in various configurations, including different pin counts such as 6 pole and 6 pin terminal blocks. This flexibility allows engineers to customize their connection setups to meet specific requirements. Additionally, the compatibility with other terminal blocks, such as the 3 pin and terminal block 6 pole, enables seamless integration within existing systems.
Enhanced Performance and Reliability
With the rising demand for high-performance robotics, reliability is of paramount importance. 4 way terminal blocks excel in this area, offering stable connections that withstand demanding operating conditions. The secure wire-to-wire contact ensures excellent conductivity, minimizing signal loss and maximizing system efficiency. Furthermore, their durable construction and resistance to shocks and vibrations contribute to long-term reliability in critical applications.
Emerging Trends and Future Innovations
As technology progresses, the field of robotics continues to evolve at a rapid pace. In line with this, 6 pin terminal block are witnessing continuous advancements to meet the ever-changing industry demands. Manufacturers are investing in research and development to improve features such as compactness, higher pin counts, and enhanced conductivity. These innovations enable seamless integration of 6 pin terminal block in smaller, more sophisticated robotic systems, paving the way for next-generation automation.
Unrivaled Excellence in Connections
In the realm of terminal blocks, HONG YI-HOMNECKS+PCB TERMINAL BLOCK is a name synonymous with excellence. Combining years of industry experience with cutting-edge technology, their terminal blocks provide unmatched performance and reliability. Backed by rigorous quality control measures, HONG YI-HOMNECKS+PCB TERMINAL BLOCK ensures that their products deliver consistent results, meeting the highest standards of efficiency and durability. With their exceptional service and commitment to customer satisfaction, HONG YI-HOMNECKS+PCB TERMINAL BLOCK is the go-to choice for businesses seeking reliable and future-proof connection solutions.
In summary, 4 way terminal blocks offer a game-changing solution for optimizing connection efficiency in robotics applications. Their versatility, reliability, and compatibility with various pin configurations make them an indispensable component in modern control systems. As the industry continues to progress, it is imperative to stay updated with emerging trends and innovations, ensuring that your robotic systems are equipped with the latest advancements. Trusting a reputable brand like HONG YI-HOMNECKS+PCB TERMINAL BLOCK ensures that you're investing in high-quality products and services that will drive your robotic applications forward.